
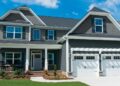
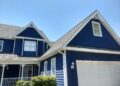
Diving into the world of exterior hardie board installation, this introduction sets the stage for a comprehensive look at the process. Hardie board, known for its durability and aesthetic appeal, has become a top choice for exterior siding projects. Throughout this guide, we will explore the ins and outs of installing Hardie board, from preparation to finishing touches.
As we embark on this journey, we will uncover essential tips and techniques to ensure a successful installation, providing all the necessary information for a seamless project.
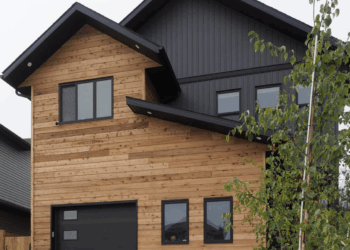
Introduction to Hardie Board Installation
Hardie board, also known as fiber cement siding, is a durable and versatile material made from a combination of cement, sand, and cellulose fibers. It is designed to mimic the look of traditional wood siding while offering superior durability and resistance to the elements.
One of the main benefits of Hardie board for exterior installations is its resistance to rot, moisture, insects, and fire. This makes it a popular choice for homeowners looking for a low-maintenance and long-lasting siding option.
Durability and Longevity
- Hardie board is known for its exceptional durability, with a lifespan of 30-50 years when properly installed and maintained.
- Unlike wood siding, Hardie board does not warp, crack, or rot, making it a reliable choice for areas with harsh weather conditions.
- Its fire-resistant properties also make it a safer option for homes in wildfire-prone areas.
Preparation for Installation
Proper preparation is key to a successful Hardie board installation. This includes gathering the necessary tools and materials, ensuring the surface is ready, and following the correct steps.
Tools and Materials Needed
- Hardie board panels
- Tape measure
- Pencil
- Straight edge
- Circular saw with a carbide-tipped blade
- Safety goggles
- Dust mask
- Galvanized nails or screws
- Hammer or screwdriver
- Joint flashing tape
- Joint sealant
- Paint and primer
Importance of Surface Preparation
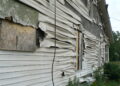
Proper surface preparation is crucial before installing Hardie board to ensure a long-lasting and secure installation. This includes removing any old siding, repairing damaged areas, and cleaning the surface thoroughly to ensure proper adhesion.
Ensuring Exterior is Ready
- Inspect the existing surface for any damage or rot and make necessary repairs.
- Clean the surface using a pressure washer or a mixture of water and mild detergent to remove dirt, dust, and debris.
- Allow the surface to dry completely before starting the installation to prevent moisture issues.
- Apply a weather-resistant barrier, such as building paper or house wrap, to provide an extra layer of protection against the elements.
- Check for proper flashing around windows, doors, and other openings to prevent water infiltration.
Installation Process

When it comes to installing Hardie board on an exterior surface, it's important to follow a step-by-step process to ensure a proper and durable installation. This involves cutting and fitting the panels accurately, as well as securing them effectively to the exterior surface.
Cutting and Fitting Hardie Board Panels
- Measure twice, cut once: Take accurate measurements before cutting the panels to ensure they fit perfectly.
- Use appropriate tools: A carbide-tipped scoring knife or shears are recommended for cutting Hardie board.
- Score and snap: Score the panel with a knife and then snap it along the scored line for a clean cut.
- Dry fit before installation: Always dry fit the panels before securing them to check for accurate sizing.
Securing Hardie Board to Exterior Surface
- Use the right fasteners: Stainless steel nails or screws are recommended for securing Hardie board.
- Pre-drill holes: To prevent cracking, pre-drill holes before driving nails or screws into the panels.
- Follow manufacturer guidelines: Be sure to follow the manufacturer's instructions for proper spacing and installation techniques.
- Apply caulk: Seal joints and edges with caulk to prevent moisture infiltration and ensure a weather-tight installation.
Finishing Touches and Maintenance
Properly finishing the edges and seams of Hardie board is crucial to achieving a polished look for your exterior. This not only enhances the overall appearance but also ensures the durability of the installation. Here are some recommended methods for finishing and maintaining Hardie board:
Finishing Edges and Seams
- Use high-quality caulk to seal the edges and seams of the Hardie board. This will prevent moisture from seeping in and causing damage over time.
- Smooth out the caulk with a putty knife for a seamless finish that blends in with the rest of the board.
- Consider using color-matched caulk to maintain a cohesive look across the entire installation.
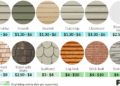
Painting or Staining Hardie Board
- Before painting or staining, make sure the Hardie board is clean and dry. Remove any dirt or debris that may affect the finish.
- Use high-quality exterior paint or stain specifically designed for use on fiber cement products like Hardie board.
- Apply the paint or stain evenly with a brush or roller, following the manufacturer's instructions for best results.
Maintenance Tips
- Regularly inspect the Hardie board for any signs of damage, such as cracks, chips, or peeling paint. Address any issues promptly to prevent further damage.
- Clean the Hardie board periodically with a mild detergent and water to remove dirt, grime, and mold buildup.
- Avoid using abrasive cleaners or tools that could scratch or damage the surface of the Hardie board.
Ending Remarks
In conclusion, exterior hardie board installation offers a robust and long-lasting solution for your home's exterior. By following the guidelines Artikeld in this discussion, you can achieve a professional finish that enhances both the look and value of your property.
Dive into the world of Hardie board installation and elevate your exterior design today.
Key Questions Answered
What are the benefits of using Hardie board for exterior installations?
Hardie board is known for its durability, resistance to weather elements, and low maintenance requirements, making it a popular choice for exterior siding.
What tools and materials are needed for installing Hardie board?
Some essential tools include a circular saw, tape measure, and a nail gun, while materials like Hardie board panels, fasteners, and caulk are necessary for a successful installation.
How should Hardie board be maintained over time?
Regular cleaning with a mild detergent and water, along with inspections for any damage, can help maintain the integrity and appearance of Hardie board over the years.


